
Creating partitions on your SSD in windows 10 or 11 is one of the most effective ways to organize your data and optimize storage performance. Whether you’re setting up a new drive or managing an existing one, this guide will walk you through every step with clarity and ease.
Understanding SSD Partitions
What is a Partition?
A partition is a logically separated section of your storage drive. It behaves like a separate disk, even though it resides on the same physical SSD.
Why Partition an SSD?
Partitioning your SSD can help:
- Separate system files from personal data
- Improve data management
- Allow dual boot setups with different operating systems
Benefits of SSD Partitioning
- Faster backups and formatting
- Safer data recovery
- Better storage optimization for games, software, and media
Precautions Before Partitioning
1. Backup Your Data
Always back up important files. Partitioning might lead to data loss if done incorrectly.
2. Check Existing Partitions
Use Disk Management to inspect current partitions before making changes.
3. Free Up Unallocated Space
You can only create new partitions from unallocated space. If you don’t have any, you’ll need to shrink an existing volume.
Tools You Can Use
| Tool | Purpose | Skill Level |
|---|---|---|
| Disk Management | Built-in GUI tool | Beginner |
| Command Prompt (DISKPART) | Advanced manual method | Intermediate |
| MiniTool Partition Wizard | User-friendly third-party tool | Beginner-Intermediate |
Step-by-Step: Creating a Partition Using Disk Management
1. Accessing Disk Management
- Press
Win + X→ Click Disk Management - Or type “Create and format hard disk partitions” in the Start menu
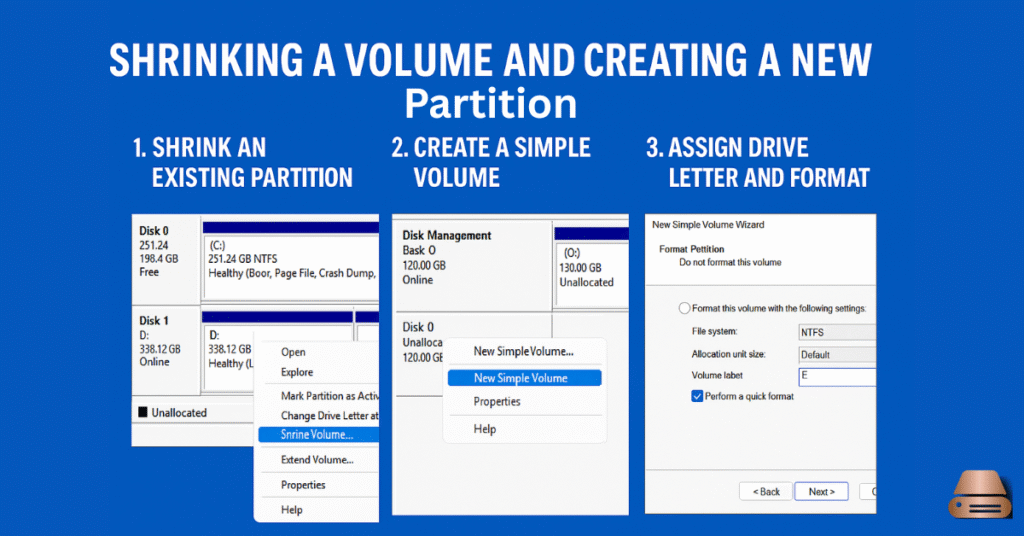
2. Shrink an Existing Volume
- Right-click the main partition (usually C:)
- Select Shrink Volume
- Enter the amount of space to shrink (in MB) and click Shrink
3. Create a New Simple Volume
- Right-click on the unallocated space
- Select New Simple Volume
- Follow the wizard to assign drive letter and format
Creating a Partition via Command Prompt (DISKPART)

1. Open Command Prompt as Admin
- Type
cmdin Start menu → Right-click → Run as administrator
2. Run DISKPART Commands
bashCopyEditdiskpart
list disk
select disk 0 (or your SSD number)
create partition primary size=xxxx
format fs=ntfs quick
assign letter=X
- Replace
xxxxwith size in MB andXwith your desired drive letter.
3. Exit DISKPART
Type exit twice to close DISKPART and Command Prompt.
Using Third-Party Software
If Disk Management feels limited, try:
These tools offer:
- Visual drag-and-drop interface
- Ability to resize without data loss
- Safe partition recovery features
Partitioning a New SSD
1. Install the SSD
Ensure your new SSD is physically connected and detected by BIOS.
2. Initialize the Disk
- Open Disk Management
- If prompted, choose GPT (for UEFI) or MBR (for legacy BIOS)
3. Create Partitions
Right-click unallocated space and follow the new volume wizard to create multiple partitions.
Naming and Formatting Partitions
File System Choices
- NTFS: Default for Windows
- exFAT: Great for cross-platform usage
- FAT32: Older systems compatibility
Drive Labels and Quick Format
Assign a name like “Games”, “Work”, or “Backup” to keep things organized.
Common Partitioning Mistakes to Avoid
- Formatting the wrong drive
- Choosing FAT32 for large files
- Partitioning without a backup
Double-check every step before you click “Next.”
Reversing or Deleting a Partition
Sometimes you might want to undo a partition or merge it with another. Here’s how:
How to Delete a Partition
- Open Disk Management.
- Right-click the partition you want to delete.
- Select Delete Volume → Confirm.
⚠️ This erases all data on that partition. Be sure to back up first!
Merging or Extending Partitions
If you have adjacent unallocated space:
- Right-click the partition you want to extend.
- Click Extend Volume.
- Follow the wizard to merge space.
If they’re not adjacent, use third-party software like EaseUS to combine them safely.
How to Check If SSD is Partitioned Properly
After creating or modifying a partition, verify everything works:
1. Use Disk Management
- Open Disk Management and check partition layout.
- Ensure each partition is healthy and formatted.
2. File Explorer View
- Open File Explorer → Check if new drives are listed.
- Test by transferring a small file to confirm functionality.
3. Optional: Use Third-Party Tools
Apps like CrystalDiskInfo or Partition Wizard can display detailed partition info and health status.
How Many Partitions Should You Have?
There’s no one-size-fits-all, but here are some tips:
| Usage Type | Suggested Partitions |
|---|---|
| Basic User | 1 for OS, 1 for personal data |
| Gamer | 1 for OS, 1 for games |
| Content Creator | 1 for OS, 1 for media files, 1 for backups |
| Developer / Dual Boot | Separate partitions for each OS and project files |
Avoid excessive partitioning—it may complicate space management.
Pros and Cons of Partitioning an SSD
✅ Pros:
- Better data organization
- Isolates system from personal files
- Enables dual boot
- Easier backup and recovery
❌ Cons:
- Risk of insufficient space if not planned well
- May reduce SSD lifespan with excessive resizing
- Potential data loss during incorrect partitioning
When Not to Partition Your SSD
There are a few cases where partitioning may do more harm than good:
- Limited SSD space (e.g., 128GB or less)
- Gaming setups where performance is priority
- Media-heavy tasks that need maximum continuous read/write speeds
In these scenarios, keep your SSD as one large partition and organize via folders.
SSD Partitioning for Dual Boot
Setup for Dual Operating Systems
Want to run Windows and Linux on the same SSD?
- Create separate partitions for:
- Windows OS (NTFS)
- Linux root (
ext4) - Linux swap
- Optional: Shared Data partition (exFAT)
BIOS/UEFI Consideration
- Use GPT with UEFI for modern systems.
- Disable Secure Boot for Linux if needed.
Make sure to install Windows first, then Linux, to avoid bootloader issues.
Conclusion
Creating a partition in your SSD on windows 10 or 11 doesn’t have to be intimidating. Whether you’re organizing data, preparing for dual boot, or optimizing performance, knowing how to properly manage partitions puts you in full control of your storage.
Start with Disk Management for simple tasks, or move to third-party tools if you need advanced features. Just remember: backup first, plan wisely, and double-check everything before clicking “Next.”
FAQs: How to Create Partition in SSD windows 10 or 11
Is it safe to partition an SSD in Windows 10?
Yes, it’s perfectly safe when done through Disk Management or trusted tools. Just ensure you back up your data.
Does partitioning affect SSD performance?
No major impact, but excessive resizing or poor planning may lead to space issues or fragmentation.
Can I partition without formatting the SSD?
Yes, you can shrink or create new partitions without deleting existing data.
How much space should I leave unallocated on an SSD?
It’s good to leave 10–20% unallocated for overprovisioning and drive longevity.